Showing posts with label tutorial. Show all posts

Monday, March 24, 2014

WMIC Tips, Export format and get hint about callable Actions

On windows , you can use wmic to list all process running by type process in the wmic console.
image

Also you can run some filter, like listing all  notepad.exe
procecss where name=”notepad.exe” list brief

image

if we don’t know which field are available to get for this Process object, try get /?

image

so we can call process where name=”notepad.exe” get commandline, name, processid

image

if we want to kill those processes, we can call call /? to see available actions

image

So we can call terninate method to kill all notepad.exe

image

then all process are gone,

we can do this same thing on service,

image

to export all the service you can run wmic /output:file  service where state=”running” /format:htable

image

image

Thursday, March 13, 2014

Apache Archiva, yet another simple Maven repository in your enterprise

Before I got a chance to play Archiva, I’ve always used the Nexus as the my maven repository across different machines. Now it turns out the Archiva is very easy to use and pretty powerful for most features I used in Nexus.
  Apache archiva is s standard jsp application, we can hosted in any container or just run as standalone,
image

the major usage of Archiva for me is to use it as a central repository to store all my artifacts. Basically when you are done with your project, run a “maven deploy” it will deploy it to your central repository, then across the computers you work, you can find those jars both on runtime or compile time. 

To do that, we need config a setting on the ~/.m2/settings.xml, put the server credentials there , and one your project pom file, put the repository as one of the distributionManagement subnode.

on the settings.xml,
add my own repositories that are proxyed and cached to remote,
image

then on the client pom.xml. just add the repository to the distributionmgmt

image

then once we run the mvn deploy, it will be deployed to the centorl internal repo.

Thursday, September 23, 2010

How to download and compile, run Tika on windows tutorial

You might get scarred when you first try to download and run Tika on windows, If you dont have some experience of SVN and Maven like me. Here is a quick tutorial to go through these processes.

1. Use subversion client to download the source code of tika.

there is one Windows Shell Extension for Subversion, just download and install it to your windows box. then Right click one folder like C:\temp\tike, and CLick the Svn checkout context menu.

image

enter the SVN source url. http://svn.apache.org/repos/asf/tika/trunk

image

it may take couple seconds to download the source code . Click Ok when done.

image

2. Download Maven , the Build utility like the msbuild, ant. and put the mvn.bat folder to windows PATH.

After the path is set, you should be able to run “mvn” at the command prompt.

image

3. Go the the download tike source folder c:\temp\tika. and run “mvm install”

the builder will download necessary component and compile the project. this make take a while

image

4. run the tika app now.

go to that folder, run “java –jar tika-app-0.8-snapshot.jar –m a.txt”

to pull the metadata of a.txt

image

or –t  yourpdf.pdf to extract the pdf file content

Thursday, September 16, 2010

How to Create a Mysql NDB cluster on a PC, windows 7 tutorial

Just like How to create a Cassandra cluster on a single PC / windows Tutorial, I will list the prerequisites and point of config , then will go through a simple cluster configuration step by step.  I will create a two storage Node + 1 Management Node + one MySQl (API Node)

before you try to run/create a cluster, please check the following requirements.

  • Two TCP Ports,make sure no apps are using these two ports. also check the firewall policy. I will put P1 and P2 as reference later on. 
    • one is for Mysql API, I will put 5000 here. ( Just like the port 3306 for the standard MySQL.  the port will used for the connection library.)
    • one is the Management Port, by default is 1186.
    • No other ports are needed to be specified explicitly. ( every data node just handshake with management node first to establish the cluster membership. like the gossip-based clustering protocol.)
  • TWO Data Folders, DataFolder_1 and DataFolder_2
    • one is for Data Node. (ALL Data Nodes  in the same host will share the same folder by default. )
    • another one is for API Node ( just like the data folder in the standalone mysql, user management , information schema, those system tables.)
  • TWO Config files. Config_1 and Congfig_2
    • one is for Management Node.
    • another one is for API Node
    • NO config file for data node directly. why? when data node join the cluster, it will first talk to management node. the manage node will tell data node what it’s configuration will be.)
  • One Config folder, Conf_1
    • a central place to store Confg_1 and Config_2 , also the system generated config.

then, Let’s start the installation process. basically just copy and past files. :)

1. Download the mysql cluster bits from mysql.com. http://www.mysql.com/downloads/cluster/. My base folder is C:\mysql\mysqlcluster

unzip it , and rename the uncompressed folder . I will put it to C:\mysql\mysqlcluster\mysqlc. so the folder structure will looks like these.
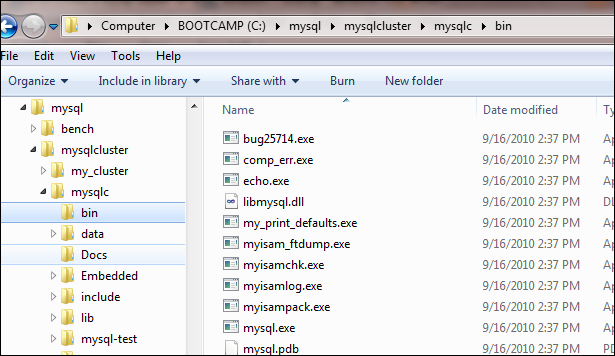
image

Add the Bin folder to the system path. then you dont have to key in the full path to execute those commands.

2. Create DataFolder_1 and Data_folder2. and One Config folder.

Data Node will be C:\mysql\mysqlcluster\my_cluster\ndb_data
   Mysql data node will be C:\mysql\mysqlcluster\my_cluster\mysqld_data
  onc folder, C:\mysql\mysqlcluster\my_cluster\conf

copy the initial Mysql and Ndbinfo folder from the downloaded data folder, here will be C:\mysql\mysqlcluster\mysqlc\data to Mysql data folder. #2 folder above.

3. Create two config file. 
   Config_1 for management node. I will put it into C:\mysql\mysqlcluster\my_cluster\conf\management.ini
 

[ndb_mgmd]
hostname=localhost
datadir=C:\mysql\mysqlcluster\my_cluster\ndb_data
id=1
[ndbd default]
noofreplicas=2
datadir=C:\mysql\mysqlcluster\my_cluster\ndb_data
[ndbd]
hostname=localhost
id=3
[ndbd]
hostname=localhost
id=4
[mysqld]
Id=50

then the config_2 for mysql API Node.

I will put it into C:\mysql\mysqlcluster\my_cluster\conf\mysqld.conf

[mysqld]
ndbcluster
datadir=C:\mysql\mysqlcluster\my_cluster\mysqld_data
basedir=C:\mysql\mysqlcluster\mysqlc
port=5000

4. time to kick off the Cluster.

A. Start the management Node first. ( run the initial loading. , always to be the 1st Node. waiting for all nodes to connect and join the cluster.)

ndb_mgmd -f c:\mysql\mysqlcluster\my_cluster\conf\management.ini --initial --config-dir=c:\mysql\mysqlcluster\my_cluster\conf

  
after that, when you check the conf foder. one system config file will be generated.
image

Here by default, ndb_mgmt process will listen on the 1186 port and waiting for other node to join.

image

When you run the “ndb_mgm -e show” command, it will you the cluster status. at this moment, Only management Node is Ready.  other nodes are disconnected.


image

B. Start Storage Node 3. ( all you need is to specify the Management Node endpoint, If you get fail to spawn process error, put the foreground option here. )
       run “ndbd -c localhost:1186 --foreground=true”

   image

run status again, “ndb_mgm –e show”, Node 3 is up now.
image

Let’s start Node 4. run the same command. “ndbd -c localhost:1186 --foreground=true”. here is the trick. we dont specify the node id. we will talk to the mgmt node. it will assign one for you.
run status again, “ndb_mgm –e show”, Bote Nodes are ready

image

C. Start the API Node. ( which is equivalent to the mysqld in standalone mysql.)

mysqld --defaults-file="c:\mysql\mysqlcluster\my_cluster\conf\mysqld.conf"

after that, we are done. all nodes are up

image

AS a Say, all talks to Center management port , you can tell from the tcpviewer.

image

Now cluster is ready, let’s connect to the API node. and create some data.

mysql -h 127.0.0.1 –P5000 -u root
mysql> create database clusterdb;use clusterdb;
mysql> create table simples (id int not null primary key) engine=ndb;
mysql> insert into simples values (1),(2),(3),(4);
mysql> select * from simples;

here by default , the datamemory and indexmemory will determined the db capacity. because all data are stored in memory by default.

you can try push more data to the db. and query the system table.

image

since 5.1.16, we can offload the non-indexed column from memory to disk. here is the basic syntax.

CREATE LOGFILE GROUP lg_1
    ADD UNDOFILE 'undo_1.log'
    INITIAL_SIZE 16M
    UNDO_BUFFER_SIZE 2M
    ENGINE NDBCLUSTER;

    CREATE TABLESPACE ts_1
    ADD DATAFILE 'data_1.dat'
    USE LOGFILE GROUP lg_1
    INITIAL_SIZE 32M
    ENGINE NDBCLUSTER;

    create table nonmemory2(junk char(255) default null) tablespace ts_1 storage disk engine=ndb;

also, please note, even data is stored in disk, it still need a small memory footprint for each record. around 8 bytes as a point to disk.

More tutorials.
How to create a Cassandra cluster on a single PC
how to setup multi ip address on one network card
Lucene, Indexing and searching

Wednesday, September 8, 2010

Hello Lucene, Indexing and searching

I am reading the book Lucene in Action, Second Edition: Covers Apache Lucene 3.0. in the chapter one, there is one basic java program which do the 101 indexing and searching. 

  Here are some basic tutorial to do that.
  1. there is only one core jar file necessary for the engine to run, you can download it from http://www.apache.org/dyn/closer.cgi/lucene/java/

2. open the eclipse , create one java project and reference the core jar file.

3. Create a text file , and put some contents. then save it as test.txt

4. write some java code to do the indexing and searching.
 

import java.io.BufferedInputStream;
import java.io.File;
import java.io.FileInputStream;
import java.io.FileReader;
import java.io.IOException;

import org.apache.lucene.analysis.Analyzer;
import org.apache.lucene.analysis.standard.StandardAnalyzer;
import org.apache.lucene.document.Document;
import org.apache.lucene.document.Field;
import org.apache.lucene.document.Field.Index;
import org.apache.lucene.document.Field.Store;
import org.apache.lucene.document.Fieldable;
import org.apache.lucene.index.*;
import org.apache.lucene.index.IndexWriter.MaxFieldLength;
import org.apache.lucene.queryParser.QueryParser;
import org.apache.lucene.search.IndexSearcher;
import org.apache.lucene.search.Query;
import org.apache.lucene.search.ScoreDoc;
import org.apache.lucene.search.TopDocs;
import org.apache.lucene.store.Directory;
import org.apache.lucene.store.FSDirectory;
import org.apache.lucene.store.LockObtainFailedException;
import org.apache.lucene.util.Version;

public class Program {

    public static void main(String[] args) {
        try {
            IndexFile("/Users/androidyou/Documents/lucence/data/test.txt",
                    "/Users/androidyou/Documents/lucence/index");

            Search("/Users/androidyou/Documents/lucence/index","nonexistedkeyworld");
            Search("/Users/androidyou/Documents/lucence/index","apache");

        } catch (Exception e) {
            // TODO Auto-generated catch block
        }
        System.out.println("done");
    }

    private static void Search(String indexpath, String keyword) throws Exception, IOException {
        IndexSearcher searcher=new IndexSearcher(FSDirectory.open(new File(indexpath)));
        System.out.println("Search  keyword " + keyword);
        Query query=new QueryParser(Version.LUCENE_30, "content", new StandardAnalyzer(Version.LUCENE_30)).parse(keyword);

        TopDocs docs= searcher.search(query, 10);
        System.out.println("hits " + docs.totalHits);
        for(ScoreDoc doc: docs.scoreDocs)
        {
            System.out.println("doc id" + doc.doc + "doc filename" + searcher.doc(doc.doc).get("filename")) ;
        }

    }

    private static void IndexFile(String datafolder, String indexfolder) throws CorruptIndexException, LockObtainFailedException, IOException {
        Analyzer a=new StandardAnalyzer(Version.LUCENE_30);
        Directory d=FSDirectory.open(new File(indexfolder));
        MaxFieldLength mfl=new MaxFieldLength(4000);
        IndexWriter iw=new IndexWriter(d, a, mfl);

        Document doc=new Document();
        Fieldable contentfield=new Field("content", new FileReader(datafolder));
        doc.add(contentfield);
        Fieldable namefield=new Field("filename",datafolder, Store.YES, Index.NOT_ANALYZED);
        doc.add(namefield);

        iw.addDocument(doc);
        iw.commit();

    }
}

And here, if you run the program three times, there will be three “Documents” in the index repository.
  here, I will get

Search keyword nonexistedkeyworld
hits 0
Search keyword apache
hits 3
doc id 0 doc filename/Users/androidyou/Documents/lucence/data/test.txt
doc id 1 doc filename/Users/androidyou/Documents/lucence/data/test.txt
doc id 2 doc filename/Users/androidyou/Documents/lucence/data/test.txt
done

also you can download the lucene toolkit luke. and Open the index directory.

a1

from the snapshoot above, you can see there are 3 documents inside the Index. for each document, it has two fields. totally 58+1=59 terms

for the content field. by default . method Field(name , filereader) only index the field, not store it.
  when you click Documents tab, you can browse the document individually.  also you can verify that only filename is stored in the index. for the content filed, just terms. (indexed content.)

Screen shot 2010-09-08 at 11.26.41 AM

 
Locations of visitors to this page